Configuring OSPF - The Basics
We have to start somewhere so let’s look at the basics of configuring OSPF. Remember OSPF is an IGP (Interior Gateway Protocol) and allows packet authentication as well as IP multicast when sending and receiving updates. In this post we are configuring OSPF in a single area. In this topology we have four routers and two PCs. The PCs subnet are 172.30.2.0/24 and 172.30.3.0/24. We have point to point connections between each router.
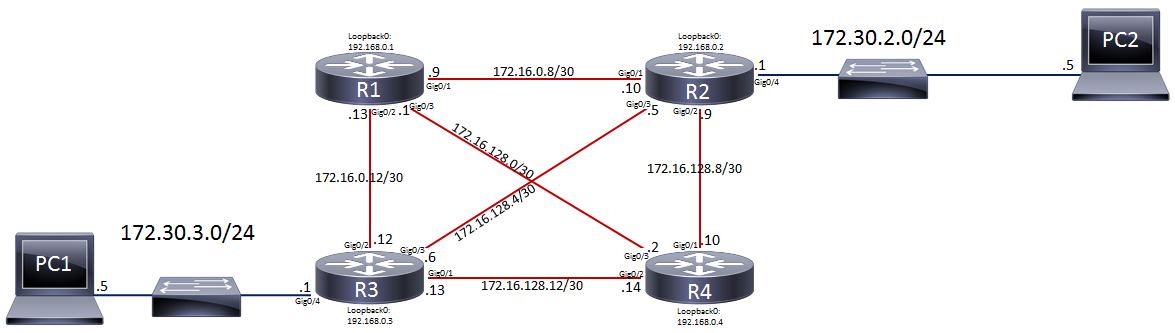
So we have already configured all of interfaces and everything seems good but PC1 can’t ping PC2 and vice versa. If we do a show ip route on R1 we can see that R1 does not know about the 172.30.2.x or 172.30.3.x network as well as any other network not directly connected to R1.
R1#show ip route
Codes: L - local, C - connected, S - static, R - RIP, M - mobile, B - BGP
       D - EIGRP, EX - EIGRP external, O - OSPF, IA - OSPF inter area
       N1 - OSPF NSSA external type 1, N2 - OSPF NSSA external type 2
       E1 - OSPF external type 1, E2 - OSPF external type 2
       i - IS-IS, su - IS-IS summary, L1 - IS-IS level-1, L2 - IS-IS level-2
       ia - IS-IS inter area, * - candidate default, U - per-user static route
       o - ODR, P - periodic downloaded static route, H - NHRP, l - LISP
       a - application route
       + - replicated route, % - next hop override

Gateway of last resort is not set

      172.16.0.0/16 is variably subnetted, 6 subnets, 2 masks
C        172.16.0.8/30 is directly connected, GigabitEthernet0/1
L        172.16.0.9/32 is directly connected, GigabitEthernet0/1
C        172.16.0.12/30 is directly connected, GigabitEthernet0/2
L        172.16.0.13/32 is directly connected, GigabitEthernet0/2
C        172.16.128.0/30 is directly connected, GigabitEthernet0/3
L        172.16.128.1/32 is directly connected, GigabitEthernet0/3
      192.168.0.0/32 is subnetted, 1 subnets
C        192.168.0.1 is directly connected, Loopback0
R3#show ip route
Codes: L - local, C - connected, S - static, R - RIP, M - mobile, B - BGP
       D - EIGRP, EX - EIGRP external, O - OSPF, IA - OSPF inter area
       N1 - OSPF NSSA external type 1, N2 - OSPF NSSA external type 2
       E1 - OSPF external type 1, E2 - OSPF external type 2
       i - IS-IS, su - IS-IS summary, L1 - IS-IS level-1, L2 - IS-IS level-2
       ia - IS-IS inter area, * - candidate default, U - per-user static route
       o - ODR, P - periodic downloaded static route, H - NHRP, l - LISP
       a - application route
       + - replicated route, % - next hop override

Gateway of last resort is not set

      172.16.0.0/16 is variably subnetted, 6 subnets, 2 masks
C        172.16.0.12/30 is directly connected, GigabitEthernet0/2
L        172.16.0.14/32 is directly connected, GigabitEthernet0/2
C        172.16.128.4/30 is directly connected, GigabitEthernet0/3
L        172.16.128.6/32 is directly connected, GigabitEthernet0/3
C        172.16.128.12/30 is directly connected, GigabitEthernet0/1
L        172.16.128.13/32 is directly connected, GigabitEthernet0/1
      172.30.0.0/16 is variably subnetted, 2 subnets, 2 masks
C        172.30.3.0/24 is directly connected, GigabitEthernet0/4
L        172.30.3.1/32 is directly connected, GigabitEthernet0/4
      192.168.0.0/32 is subnetted, 1 subnets
C        192.168.0.3 is directly connected, Loopback0
(NOTE: 1 is the process ID for OSPF you if you don’t what to use 1 we can pick between 1-65535, also this does not have match on each router).
We are now under a config-router prompt, the next thing we want to do is to tell the router what IP interface you want OSPF to run on. Looking at the network topology R1 has three interfaces let’s first choose the interface that uses the IP address 172.16.0.9 and put it in area 0. (Remember wildcard subnet masks)
R1(config)#router ospf 1
R1(config-router)#network 172.16.0.9 0.0.0.0 area 0
Side Conversation Area 0 is used for single-area configuration, you don’t have to use area 0 but it is recommended because Area 0 is special and not like the rest. If you ever needed two OSPF areas and they need to share routes together it won’t work without area 0 in the environment. Re-configuring a routing protocol on production may not be a good idea :). Another question that comes up when using the network command is why did I match the specific interface of 172.16.0.9? (network 172.16.0.9 0.0.0.0 ) Remember when we configure OSPF using the network command we are specifically looking at the individual interface of which we want OSPF sending and receiving updates. This is where it gets confusing because this command is not telling the router what to advertise it is simply telling the router which interfaces that you want OSPF running on. You could use the “lazy method” and allow all and future interfaces that the router has to use OSPF by using the command: (network 0.0.0.0 255.255.255.255). However this is a catch-22 because you are no longer in control of what interfaces that OSPF is running along with what networks are being added to OSPF. Future interfaces you configure on the router will be added to OSPF automatically and you may not want that. Personally and its a best practice to match the specific interfaces instead of using the lazy method.
So what just happened? Well nothing yet because R1 is this only router sending OSPF updates so let’s jump to R2 and run the following under the config-router prompt.
R2(config)#router ospf 1
R2(config-router)#network 172.16.0.10 0.0.0.0 area 0
R2(config-router)#
*Aug 13 01:49:33.888: %OSPF-5-ADJCHG: Process 1, Nbr 192.168.0.1 on GigabitEthernet0/1 from LOADING to FULL, Loading Done
R1#show ip ospf neighbor

Neighbor ID     Pri   State           Dead Time   Address         Interface
192.168.0.2       1   FULL/BDR        00:00:30    172.16.0.10     GigabitEthernet0/1
R2(config)#router ospf 1
R2(config-router)#network 172.30.2.1 0.0.0.0 area 0
R2(config-router)#network 172.16.128.9 0.0.0.0 area 0
R2(config-router)#network 172.16.128.5 0.0.0.0 area 0
R1(config)#router ospf 1
R1(config-router)#network 172.16.0.13 0.0.0.0 area 0
R1(config-router)#network 172.16.128.1 0.0.0.0 area 0
R1#show ip route
Codes: L - local, C - connected, S - static, R - RIP, M - mobile, B - BGP
       D - EIGRP, EX - EIGRP external, O - OSPF, IA - OSPF inter area
       N1 - OSPF NSSA external type 1, N2 - OSPF NSSA external type 2
       E1 - OSPF external type 1, E2 - OSPF external type 2
       i - IS-IS, su - IS-IS summary, L1 - IS-IS level-1, L2 - IS-IS level-2
       ia - IS-IS inter area, * - candidate default, U - per-user static route
       o - ODR, P - periodic downloaded static route, H - NHRP, l - LISP
       a - application route
       + - replicated route, % - next hop override

Gateway of last resort is not set

      172.16.0.0/16 is variably subnetted, 6 subnets, 2 masks
C        172.16.0.8/30 is directly connected, GigabitEthernet0/1
L        172.16.0.9/32 is directly connected, GigabitEthernet0/1
C        172.16.0.12/30 is directly connected, GigabitEthernet0/2
L        172.16.0.13/32 is directly connected, GigabitEthernet0/2
C        172.16.128.0/30 is directly connected, GigabitEthernet0/3
L        172.16.128.1/32 is directly connected, GigabitEthernet0/3
      172.30.0.0/24 is subnetted, 1 subnets
O        172.30.2.0 [110/2] via 172.16.0.10, 00:03:39, GigabitEthernet0/1
      192.168.0.0/32 is subnetted, 1 subnets
C        192.168.0.1 is directly connected, Loopback0
R4(config)#router ospf 1
R3(config)#router ospf 1
R4(config)#interface gigabitEthernet 0/1
R4(config-if)#ip ospf 1 area 0
*Aug 13 01:50:10.698: %OSPF-5-ADJCHG: Process 1, Nbr 192.168.0.2 on GigabitEthernet0/1 from LOADING to FULL, Loading Done
R4(config)#
R4(config)#interface gigabitEthernet 0/2
R4(config-if)#ip ospf 1 area 0
R4(config-if)#exit
R4(config)#interface gigabitEthernet 0/3
R4(config-if)#ip ospf 1 area 0
R4(config-if)#exit
*Aug 13 01:55:07.905: %OSPF-5-ADJCHG: Process 1, Nbr 192.168.0.1 on GigabitEthernet0/3 from LOADING to FULL, Loading Done
R4(config)#

--ROUTER 3 --

R3(config)#interface gigabitEthernet 0/1
R3(config-if)#ip ospf 1 area 0
R3(config-if)#exit
*Aug 13 01:58:39.091: %OSPF-5-ADJCHG: Process 1, Nbr 192.168.0.4 on GigabitEthernet0/1 from LOADING to FULL, Loading Done
R3(config)#interface gigabitEthernet 0/2
R3(config-if)#ip ospf 1 area 0
R3(config-if)#exit
*Aug 13 01:59:01.142: %OSPF-5-ADJCHG: Process 1, Nbr 192.168.0.1 on GigabitEthernet0/2 from LOADING to FULL, Loading Done
R3(config)#interface gigabitEthernet 0/3
R3(config-if)#ip ospf 1 area 0
R3(config-if)#exit
*Aug 13 01:59:37.701: %OSPF-5-ADJCHG: Process 1, Nbr 192.168.0.2 on GigabitEthernet0/3 from LOADING to FULL, Loading Done
R3(config)#interface gigabitEthernet 0/4
R3(config-if)#ip ospf 1 area 0
R3(config-if)#exit
R3(config)#
R1#show ip ospf neighbor

Neighbor ID     Pri   State           Dead Time   Address         Interface
192.168.0.4       1   FULL/BDR        00:00:35    172.16.128.2    GigabitEthernet0/3
192.168.0.3       1   FULL/BDR        00:00:35    172.16.0.14     GigabitEthernet0/2
192.168.0.2       1   FULL/DR         00:00:31    172.16.0.10     GigabitEthernet0/1

------
R2#show ip ospf neighbor

Neighbor ID     Pri   State           Dead Time   Address         Interface
192.168.0.3       1   FULL/BDR        00:00:38    172.16.128.6    GigabitEthernet0/3
192.168.0.4       1   FULL/DR         00:00:35    172.16.128.10   GigabitEthernet0/2
192.168.0.1       1   FULL/BDR        00:00:34    172.16.0.9      GigabitEthernet0/1

-------
R3#show ip ospf neighbor

Neighbor ID     Pri   State           Dead Time   Address         Interface
192.168.0.2       1   FULL/DR         00:00:32    172.16.128.5    GigabitEthernet0/3
192.168.0.1       1   FULL/DR         00:00:38    172.16.0.13     GigabitEthernet0/2
192.168.0.4       1   FULL/DR         00:00:32    172.16.128.14   GigabitEthernet0/1

--------
R4#show ip ospf neighbor
Neighbor ID     Pri   State           Dead Time   Address         Interface
192.168.0.1       1   FULL/DR         00:00:31    172.16.128.1    GigabitEthernet0/3
192.168.0.3       1   FULL/BDR        00:00:33    172.16.128.13   GigabitEthernet0/2
192.168.0.2       1   FULL/BDR        00:00:36    172.16.128.9    GigabitEthernet0/1
R3#show ip route
Codes: L - local, C - connected, S - static, R - RIP, M - mobile, B - BGP
       D - EIGRP, EX - EIGRP external, O - OSPF, IA - OSPF inter area
       N1 - OSPF NSSA external type 1, N2 - OSPF NSSA external type 2
       E1 - OSPF external type 1, E2 - OSPF external type 2
       i - IS-IS, su - IS-IS summary, L1 - IS-IS level-1, L2 - IS-IS level-2
       ia - IS-IS inter area, * - candidate default, U - per-user static route
       o - ODR, P - periodic downloaded static route, H - NHRP, l - LISP
       a - application route
       + - replicated route, % - next hop override

Gateway of last resort is not set

      172.16.0.0/16 is variably subnetted, 9 subnets, 2 masks
O        172.16.0.8/30 [110/2] via 172.16.128.5, 00:02:06, GigabitEthernet0/3
                       [110/2] via 172.16.0.13, 00:02:45, GigabitEthernet0/2
C        172.16.0.12/30 is directly connected, GigabitEthernet0/2
L        172.16.0.14/32 is directly connected, GigabitEthernet0/2
O        172.16.128.0/30
           [110/2] via 172.16.128.14, 00:03:05, GigabitEthernet0/1
           [110/2] via 172.16.0.13, 00:02:45, GigabitEthernet0/2
C        172.16.128.4/30 is directly connected, GigabitEthernet0/3
L        172.16.128.6/32 is directly connected, GigabitEthernet0/3
O        172.16.128.8/30
           [110/2] via 172.16.128.14, 00:03:05, GigabitEthernet0/1
           [110/2] via 172.16.128.5, 00:02:06, GigabitEthernet0/3
C        172.16.128.12/30 is directly connected, GigabitEthernet0/1
L        172.16.128.13/32 is directly connected, GigabitEthernet0/1
      172.30.0.0/16 is variably subnetted, 3 subnets, 2 masks
O        172.30.2.0/24 [110/2] via 172.16.128.5, 00:02:06, GigabitEthernet0/3
C        172.30.3.0/24 is directly connected, GigabitEthernet0/4
L        172.30.3.1/32 is directly connected, GigabitEthernet0/4
      192.168.0.0/32 is subnetted, 2 subnets
O        192.168.0.1 [110/2] via 172.16.0.13, 00:02:45, GigabitEthernet0/2
C        192.168.0.3 is directly connected, Loopback0
R3#show ip route
Codes: L - local, C - connected, S - static, R - RIP, M - mobile, B - BGP
       D - EIGRP, EX - EIGRP external, O - OSPF, IA - OSPF inter area
       N1 - OSPF NSSA external type 1, N2 - OSPF NSSA external type 2
       E1 - OSPF external type 1, E2 - OSPF external type 2
       i - IS-IS, su - IS-IS summary, L1 - IS-IS level-1, L2 - IS-IS level-2
       ia - IS-IS inter area, * - candidate default, U - per-user static route
       o - ODR, P - periodic downloaded static route, H - NHRP, l - LISP
       a - application route
       + - replicated route, % - next hop override

Gateway of last resort is not set

      172.16.0.0/16 is variably subnetted, 9 subnets, 2 masks
O        172.16.0.8/30 [110/2] via 172.16.0.13, 01:04:20, GigabitEthernet0/2
C        172.16.0.12/30 is directly connected, GigabitEthernet0/2
L        172.16.0.14/32 is directly connected, GigabitEthernet0/2
O        172.16.128.0/30
           [110/2] via 172.16.128.14, 01:04:40, GigabitEthernet0/1
           [110/2] via 172.16.0.13, 01:04:20, GigabitEthernet0/2
C        172.16.128.4/30 is directly connected, GigabitEthernet0/3
L        172.16.128.6/32 is directly connected, GigabitEthernet0/3
O        172.16.128.8/30
           [110/2] via 172.16.128.14, 01:04:40, GigabitEthernet0/1
C        172.16.128.12/30 is directly connected, GigabitEthernet0/1
L        172.16.128.13/32 is directly connected, GigabitEthernet0/1
      172.30.0.0/16 is variably subnetted, 3 subnets, 2 masks
O        172.30.2.0/24 [110/3] via 172.16.128.14, 00:31:22, GigabitEthernet0/1
                       [110/3] via 172.16.0.13, 00:31:22, GigabitEthernet0/2
C        172.30.3.0/24 is directly connected, GigabitEthernet0/4
L        172.30.3.1/32 is directly connected, GigabitEthernet0/4
      192.168.0.0/32 is subnetted, 2 subnets
O        192.168.0.1 [110/2] via 172.16.0.13, 01:04:20, GigabitEthernet0/2
C        192.168.0.3 is directly connected, Loopback0
R3#