Setting up Enhanced vPC on Nexus 5600
So I've played around with two Cisco Nexus 5672UP switches which will be in production soon but before that I wanted to see what it took to get enhanced vPC online. Along the way I was into some new territory as I never stood up vPC before, so in this post I have posted some things to keep in mind and running-config examples, all of which I hope is helpful for a reference.
Before we go into the configuration of vPC I wanted to mentioned that the Nexus 5600 series switch is a newer product in the Cisco Data Center portfolio. I would guess that it would eventually replace the 5500 Nexus switch series but as of this writing Cisco has not put any end of life notice on the 5500 hardware. One of the main differences on the 5600 is the built-in layer 3 capabilities. The 5500 required a layer 3 card that used an expansion slot and only the higher-end Nexus products offered layer 3. To find out more information about the 5600 on Cisco's website: Cisco Nexus 5600 Platform Switches Data Sheet
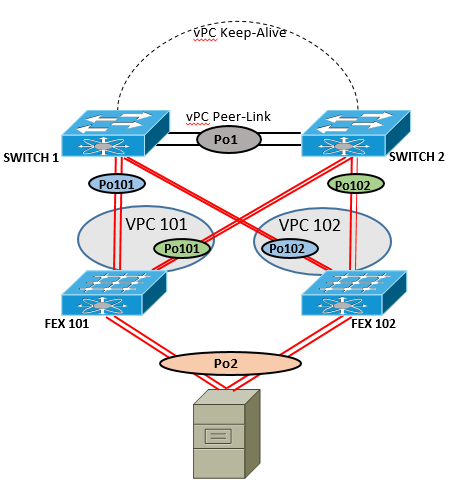
So when I was looking at configuration examples I noticed some confusion between a dual-homed FEX setup and an enhanced vPC setup, so I'll try to clear the air. The "Enhanced" vPC is able to set up an etherchannel link from two different Nexus switches. The host/server that connects to these two different Nexus switches must support Active/Active NICs. This configuration is almost the same if you were setting up a dual-homed FEX but with just Active/Passive NICs setup on the host/server. So here is a question if the configuration is almost the same what needs to be added to support enhanced vPC? The software I am working with is version 7.0(1)N1(1) and we need to enable the features of vpc, fex and lacp.
feature vpc
feature fex
feature lacp
vlan 25-35
SWITCH 1:
vpc domain 1 peer-keepalive destination 169.254.1.2 source 169.254.1.1
SWITCH 2:
vpc domain 1 peer-keepalive destination 169.254.1.1 source 169.254.1.2
A note about the peer-keepalive, the 5500/5600 Nexus has a dedicated management NIC card on the front of the unit. (Where the power is) The reason I did this was I did not want to waste a 10Gb connection for just a keep-alive link. (Although it can be done :/ ) In this example I don't have a "dedicated" management network so I decided to use the management NIC of both 5ks. By default you have a another vrf context called management on the 5ks running-config. So on both 5ks I give that vrf context an IP address and directly connected both 5ks together.
SWITCH 1:
interface mgmt0 vrf member management ip address 169.254.1.1/24
SWITCH 2:
interface mgmt0 vrf member management ip address 169.254.1.2/24
We now need to create a vPC peer-link between the two Nexus switches. In this example I am using two 10Gb links, which are the same interfaces on both Nexus switches. (Consistency is your friend)
interface Ethernet1/31
  channel-group 1 mode active

interface Ethernet1/32
  channel-group 1 mode active
interface port-channel1
  switchport mode trunk
  switchport trunk allowed vlan 25-35
  vpc peer-link
interface Ethernet1/1
  description FEX-101-PORT-1
  switchport mode fex-fabric
  fex associate 101
  channel-group 101

interface Ethernet1/2
  description FEX-101-PORT-3
  switchport mode fex-fabric
  fex associate 101
  channel-group 101

interface port-channel101
  switchport mode fex-fabric
  fex associate 101
  vpc 101
interface Ethernet1/1
  description FEX-101-PORT-2
  switchport mode fex-fabric
  fex associate 101
  channel-group 101

interface Ethernet1/2
  description FEX-101-PORT-4
  switchport mode fex-fabric
  fex associate 101
  channel-group 101

interface port-channel101
  switchport mode fex-fabric
  fex associate 101
  vpc 101
interface Ethernet1/3
  description FEX-102-PORT-1
  switchport mode fex-fabric
  fex associate 102
  channel-group 102

interface Ethernet1/4
  description FEX-102-PORT-3
  switchport mode fex-fabric
  fex associate 102
  channel-group 102

interface port-channel102
  switchport mode fex-fabric
  fex associate 102
  vpc 102
interface Ethernet1/3
  description FEX-102-PORT-2
  switchport mode fex-fabric
  fex associate 102
  channel-group 102

interface Ethernet1/4
  description FEX-102-PORT-4
  switchport mode fex-fabric
  fex associate 102
  channel-group 102

interface port-channel102
  switchport mode fex-fabric
  fex associate 102
  vpc 102
interface eth101/1/1, eth101/1/2
channel-group 2 mode active
interface eth102/1/1, eth102/1/2
channel-group 2 mode active
interface po2
switchport access vlan 25