Site-To-Site VPN via CCP
 I have ran through before on how to create a site-to-site VPN with Cisco SDM which sounds like a repeat but I thought why not bring CCP into light and since I'm studying the newly created CCNA Security (640-554) I figured let's create a tutorial on it. In this lab I am going to post the running-config of both locations so you can either run it through Packet Tracer or live equipment if you wish. I am running two Cisco 2811s with Advanced Security Version 12.4(24)T8. Let's do it!
Take a look at my setup, I am running in the RFC 1918 range on a closed track and "technically" have a third router in the middle just to route between the two serial interfaces to "simulate" the internet. Branch-1 does not know about the LAN on Branch-2, and Branch-2 does not know about the LAN on Branch-1. Our task is to configure a Site-To-Site VPN between the two remote Branch offices to be able reach the remote LANs.  Before we jump right into it here is the running-config of both Branch routers before a VPN is setup so you can walk through this yourself.
BRANCH-1:
version 12.4
service timestamps debug datetime msec
service timestamps log datetime msec
no service password-encryption

hostname BRANCH-1

boot-start-marker
boot-end-marker

logging message-counter syslog
no aaa new-model
dot11 syslog
ip source-route

ip cef
ip dhcp excluded-address 192.168.40.0 192.168.40.5

ip dhcp pool DHCP-40-POOL
 network 192.168.40.0 255.255.255.0
 dns-server 208.67.222.222
 default-router 192.168.40.1
 domain-name BRANCH1.ryansrealm.com

multilink bundle-name authenticated

username admin privilege 15 secret 5 (MD5 Hashed Password)

archive log config hidekeys

interface FastEthernet0/0
 description LOCAL-LAN
 ip address 192.168.40.1 255.255.255.0
 ip nat inside
 ip virtual-reassembly
 duplex auto
 speed auto

interface Serial0/0/1
 description CONNECTS-TO-INTERNET
 ip address 192.168.20.10 255.255.255.252
 ip nat outside
 ip virtual-reassembly

ip forward-protocol nd
ip route 0.0.0.0 0.0.0.0 Serial0/0/1
ip http server
ip http authentication local
no ip http secure-server

ip nat inside source list 5 interface Serial0/0/1 overload
access-list 5 permit 192.168.40.0 0.0.0.255

line con 0
 logging synchronous

line aux 0
line vty 0 4
 login local

scheduler allocate 20000 1000
end
version 12.4
service timestamps debug datetime msec
service timestamps log datetime msec
no service password-encryption

hostname BRANCH-2

boot-start-marker
boot-end-marker

logging message-counter syslog
no aaa new-model
dot11 syslog
ip source-route

ip cef
no ip dhcp use vrf connected
ip dhcp excluded-address 192.168.50.0 192.168.50.5

ip dhcp pool DHCP-50-POOL
 network 192.168.50.0 255.255.255.0
 default-router 192.168.50.1
 dns-server 208.67.222.222
 domain-name BRANCH2.ryansrealm.com

multilink bundle-name authenticated

username admin privilege 15 secret 5 (MD5 Hashed Password)

archive log config hidekeys

interface FastEthernet0/0
 description LOCAL-LAN
 ip address 192.168.50.1 255.255.255.0
 ip nat inside
 ip virtual-reassembly
 duplex auto
 speed auto

interface Serial0/0/0
 description CONNECTS-TO-INTERNET
 ip address 192.168.20.2 255.255.255.252
 ip nat outside
 ip virtual-reassembly
 no fair-queue

ip forward-protocol nd
ip route 0.0.0.0 0.0.0.0 Serial0/0/0
ip http server
ip http authentication local
no ip http secure-server

ip nat inside source list 5 interface Serial0/0/0 overload
access-list 5 permit 192.168.50.0 0.0.0.255

line con 0
 logging synchronous

line aux 0
line vty 0 4
 login local

scheduler allocate 20000 1000
end
So let' fire up CCP and get started configuring this VPN. Check out my Introduction into CCP which talks about what CCP is and goes through the some of the basics on how to discover devices. So for this example I already have CCP opened on a PC that is on Branch-1's LAN and have already discovered Branch-1. In CCP I want to create a site-to-site VPN so in order for that to happen I'll click Configure at the top of the program and expand the Security folder and select Site-To-Site VPN. 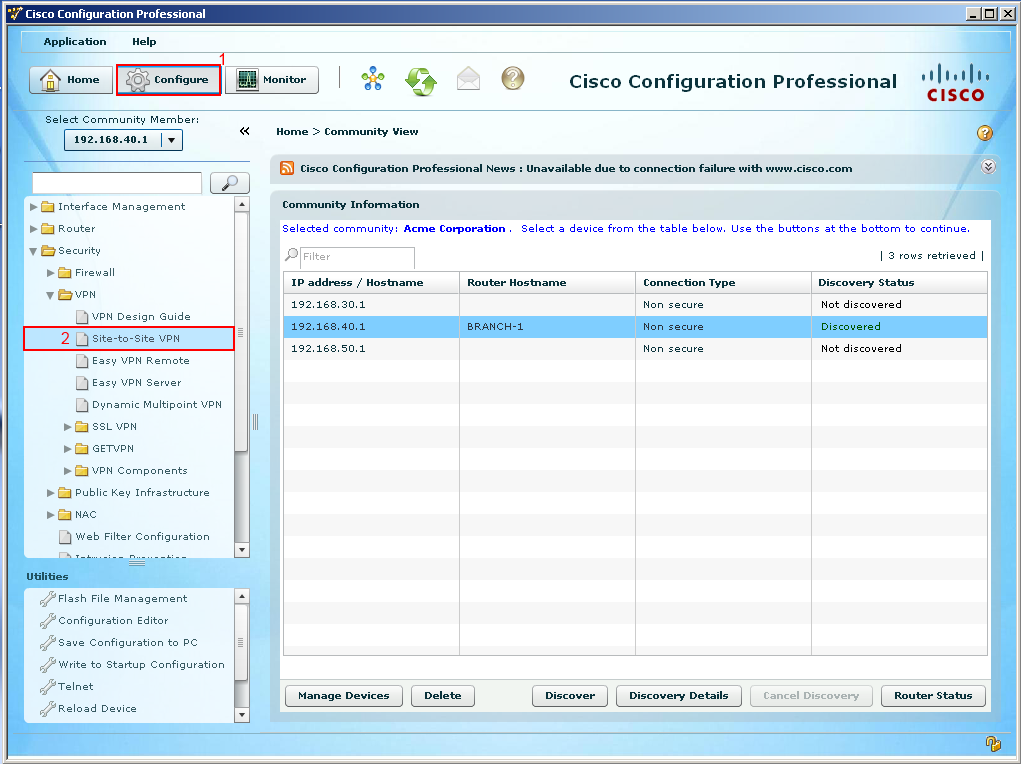 Once we selected the site-to-site VPN option we are presented with a general overview of what a site-to-site VPN is and its functions. Our task is to create a site-to-site VPN so let us select the tab "Create a Site-To-Site-VPN" and then follow that by selecting "Launch the selected task" button.
 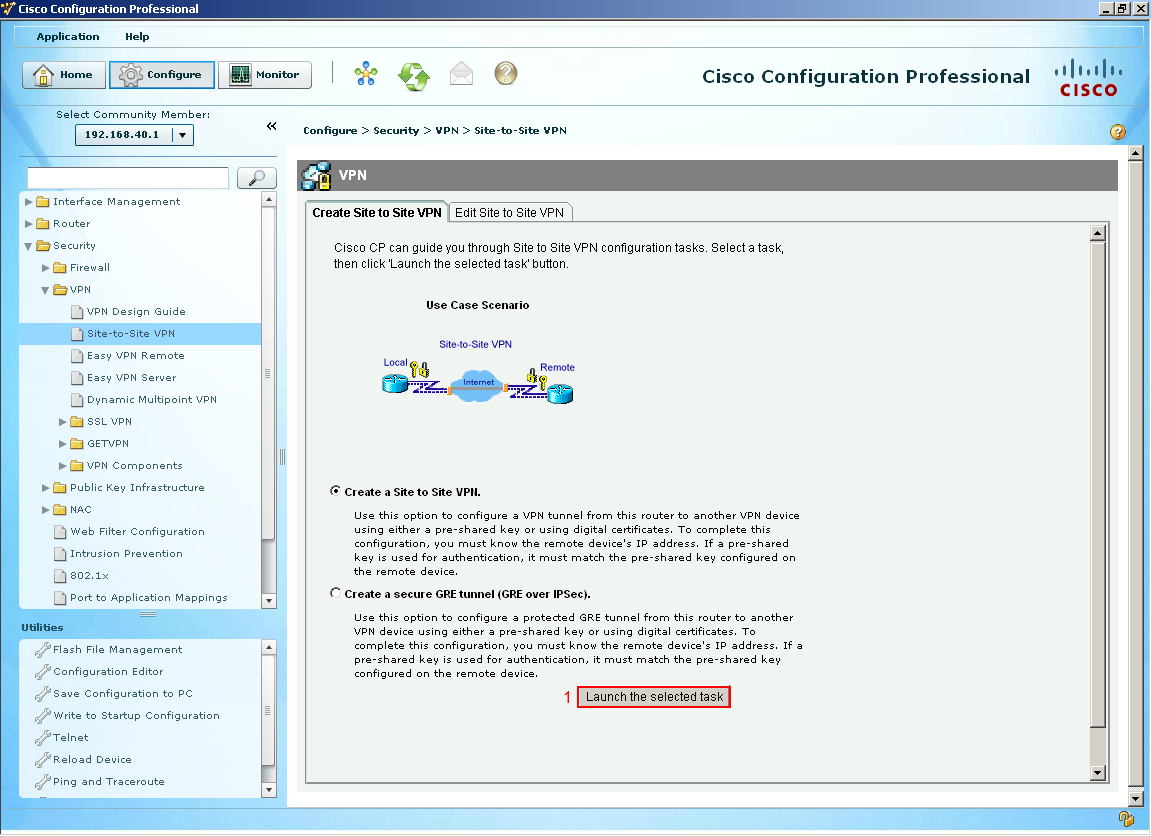 A window popup should appear something like picture below, basically giving you two options. The quick setup would probably work as it would generate a lot of default commands and if you have two Cisco routers at each end it along with running the quick setup on both ends, you would probably get a VPN up and running with very little configuration effort on your part. But for this guide I want to walk through the advanced setup and look at all the gears and knobs of a VPN. Let's continue select next.
 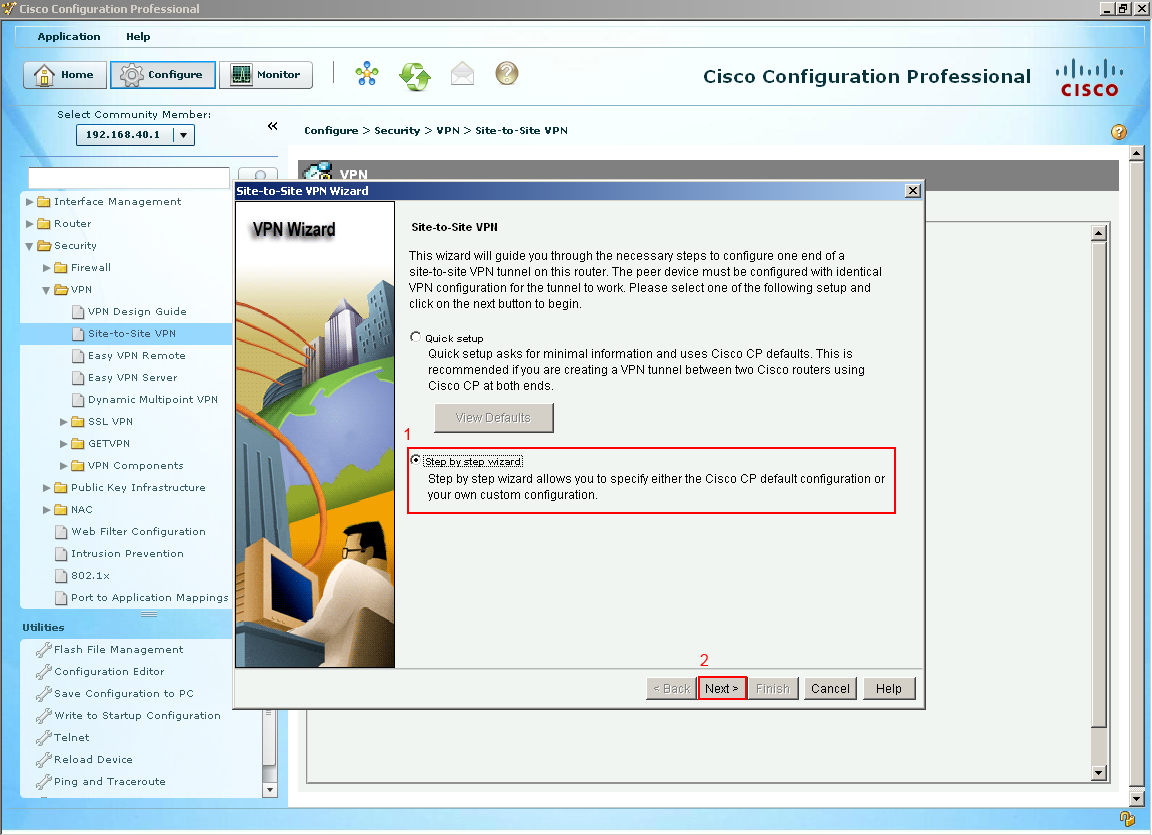 The next couple of options go over the IKE proposals (Internet Key Exchange) which is all about handling the way keys are passed between devices. So we are not even talking about data being passed yet, just ISAKMP. Since we are on Branch-1 we want to select our outside interface which happens to be the (1) serial interface 0/0/1. The next option is selecting who our peer is or where would we like to build a VPN tunnel which in this case its Branch-2 who's outside address is (2) 192.168.20.2. The final section is to create a (3) pre-shared Key that must match on both sides. It is best to create long pre-shared key in a production environment but since this is on a closed course I kept it short and simple, select next.
 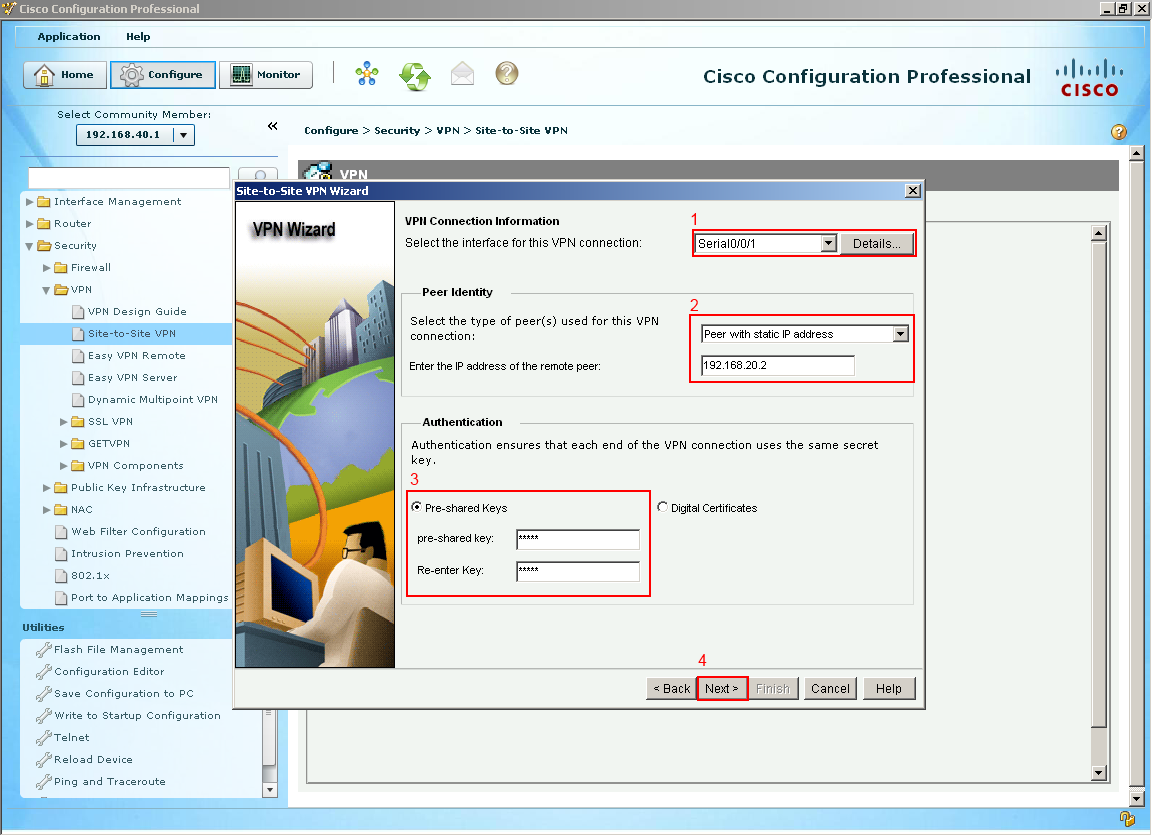 Like mentioned their actually two tunnels being built for this VPN one of them is just the routers to talk amongst themselves to make sure they agree on the keys and secrets and a second one for data traffic to pass through. This IKE default proposal would work if Branch-2 had the same proposal on Branch-2 but let's create our own. Select Add.
  Another window shows and we are now configuring the IKE Policy, I decided to use (1) AES 256 bit encryption with (2) SHA 1 which is 160 bit hash we are using (3) shared secrets with a (4) Diffie Hellman group 2 and finally with a lifetime of 24 hours which is default. Select OK
 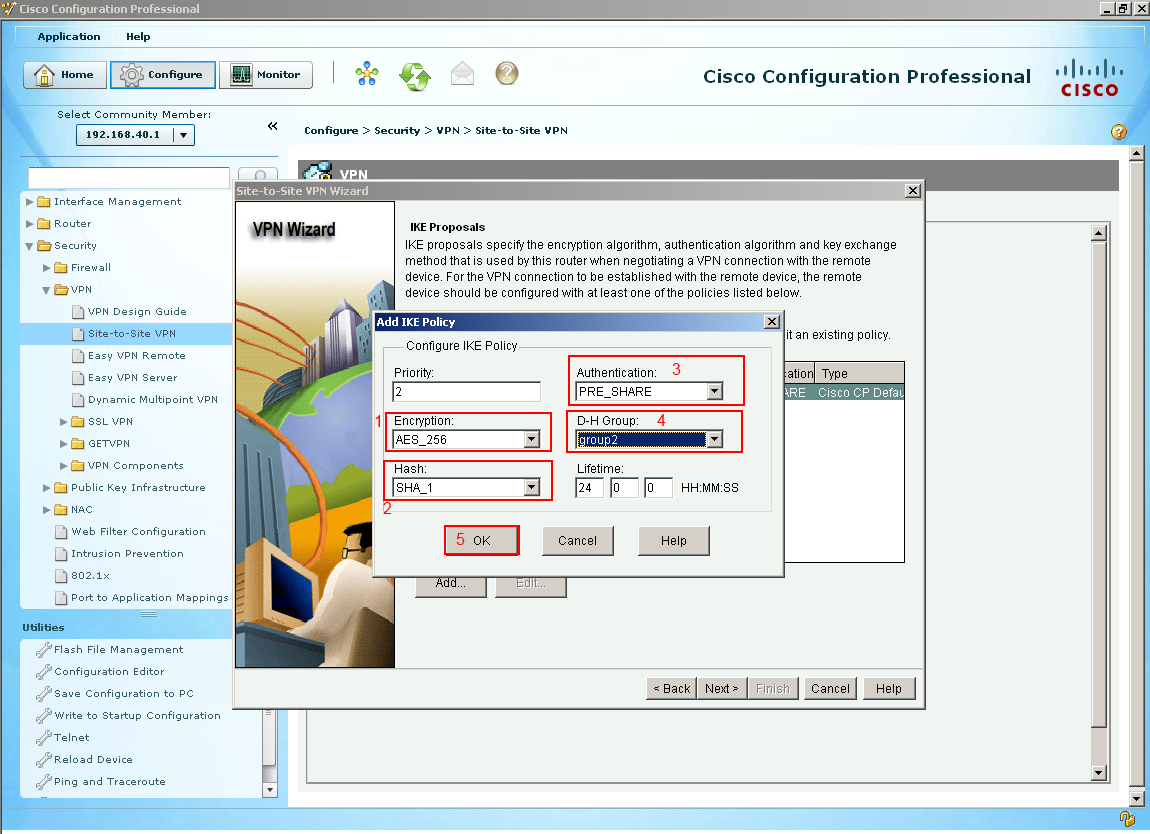 Now we can see our other IKE proposal that we created. Select Next.
 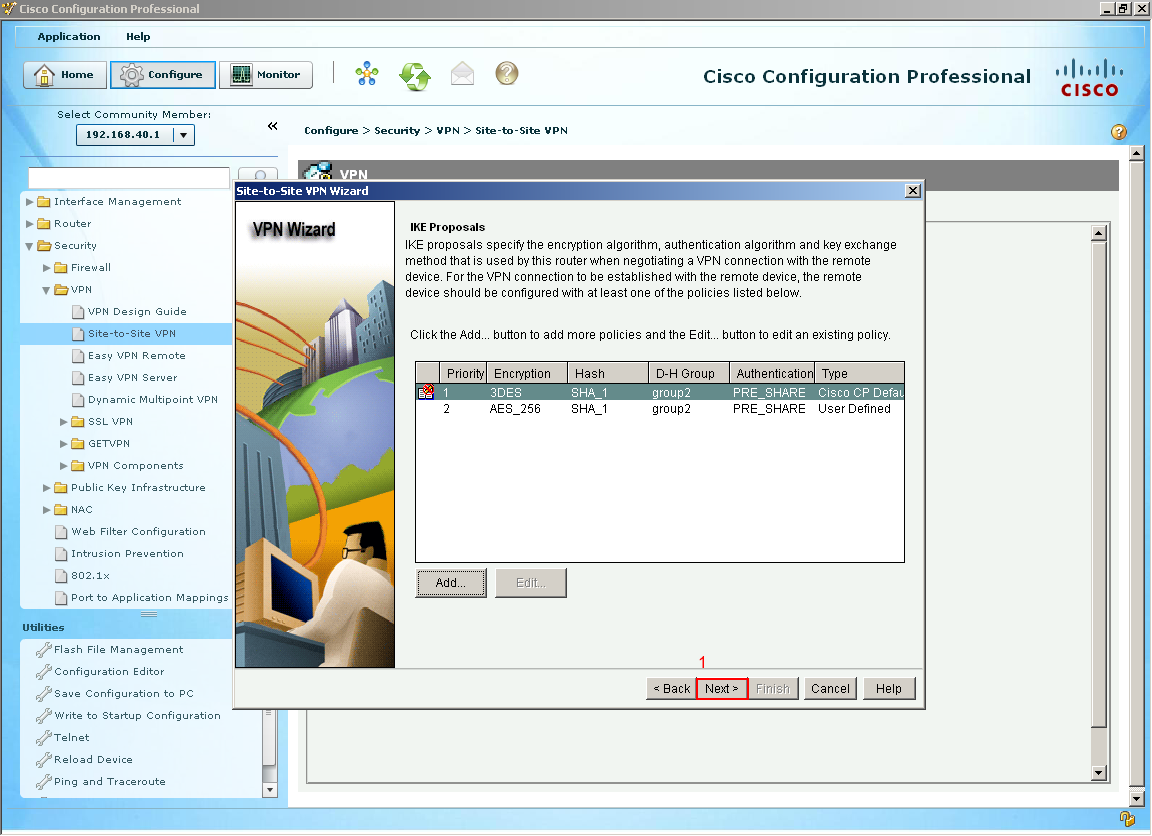 The next section is for our IPsec Tunnel which is the tunnel that our data goes through select add to create a transform set, I am going to call this set (1) "BRANCH-TRANS-SET" we are going to (2) check the integrity of data also called ESP. For the (3) Integrity Algorithm will be ESP SHA HMAC and the (4) encryption will be ESP AES 256. Select OK.
 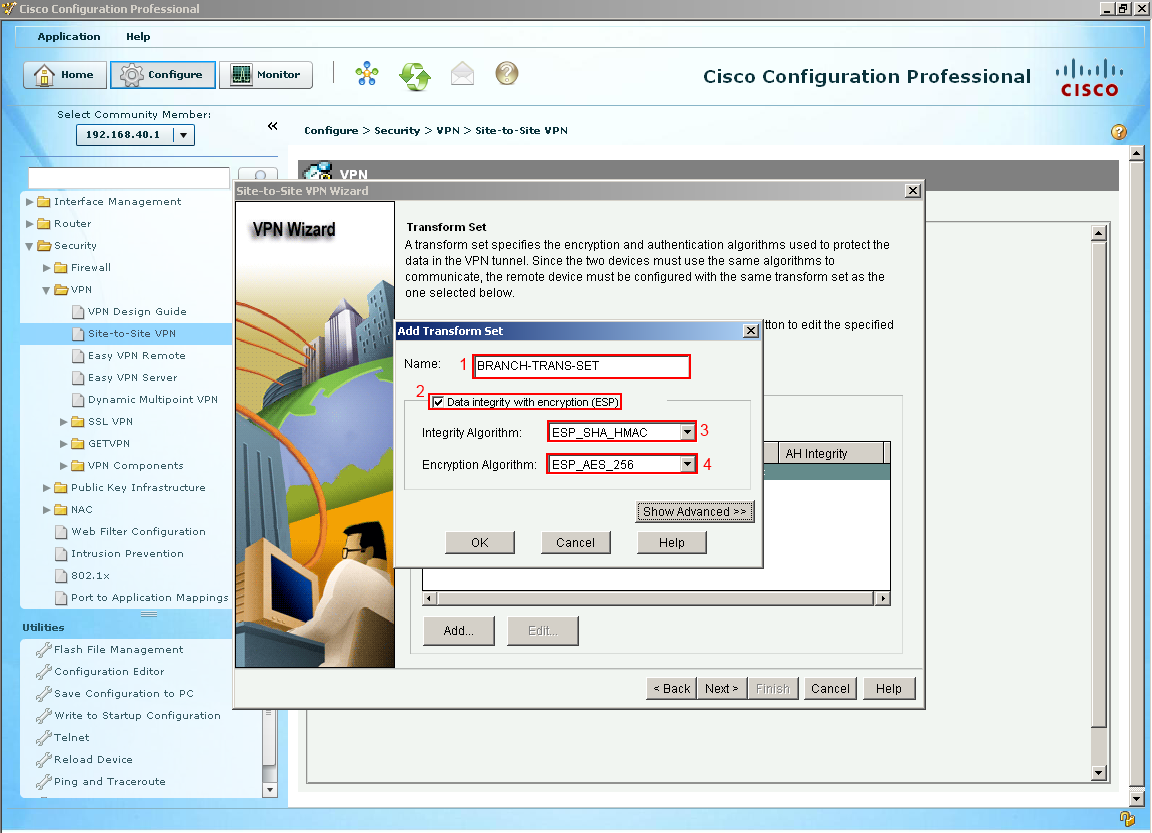 Our Transform Set is created and we could create more if we wanted to. Let's select next
 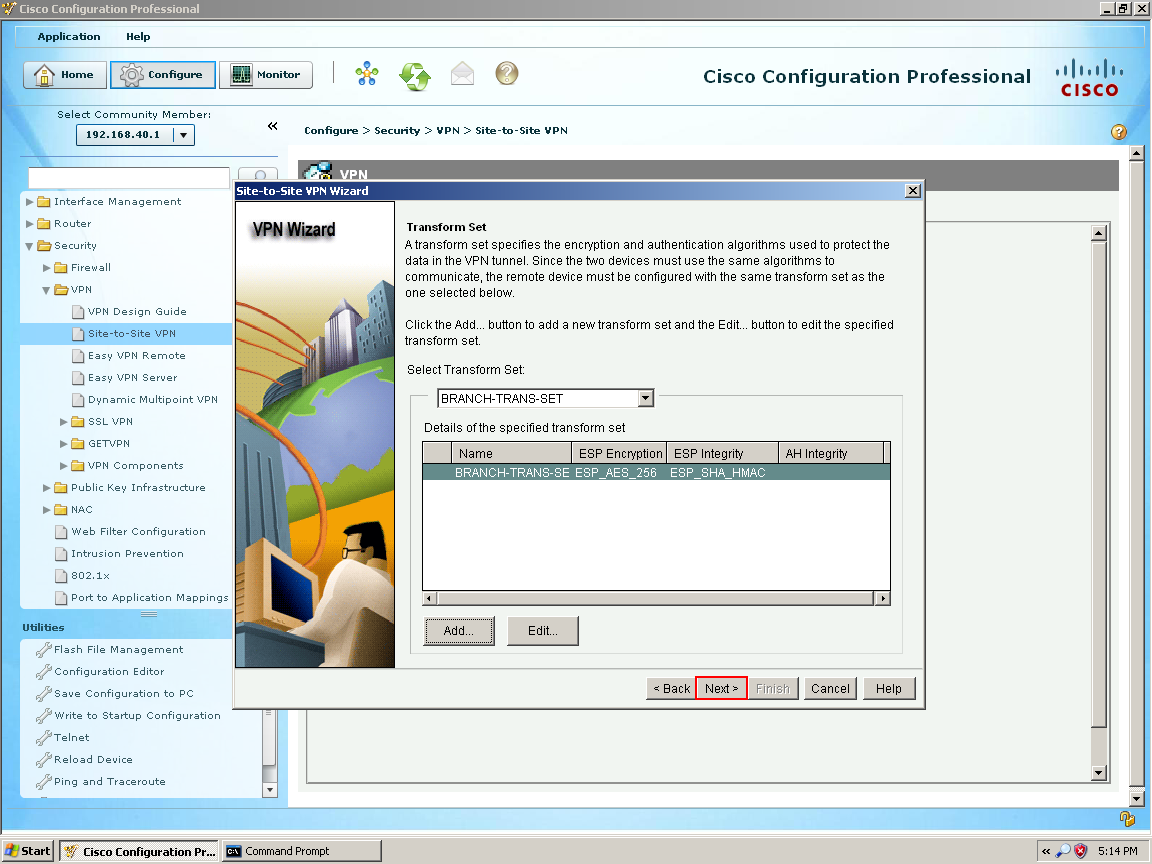 This next section is what traffic would we like to protect with our recently IPec tunnel so we type our local LAN because we want to be able access the remote network (Branch-2's LAN) over our protected tunnel. Select Next.
 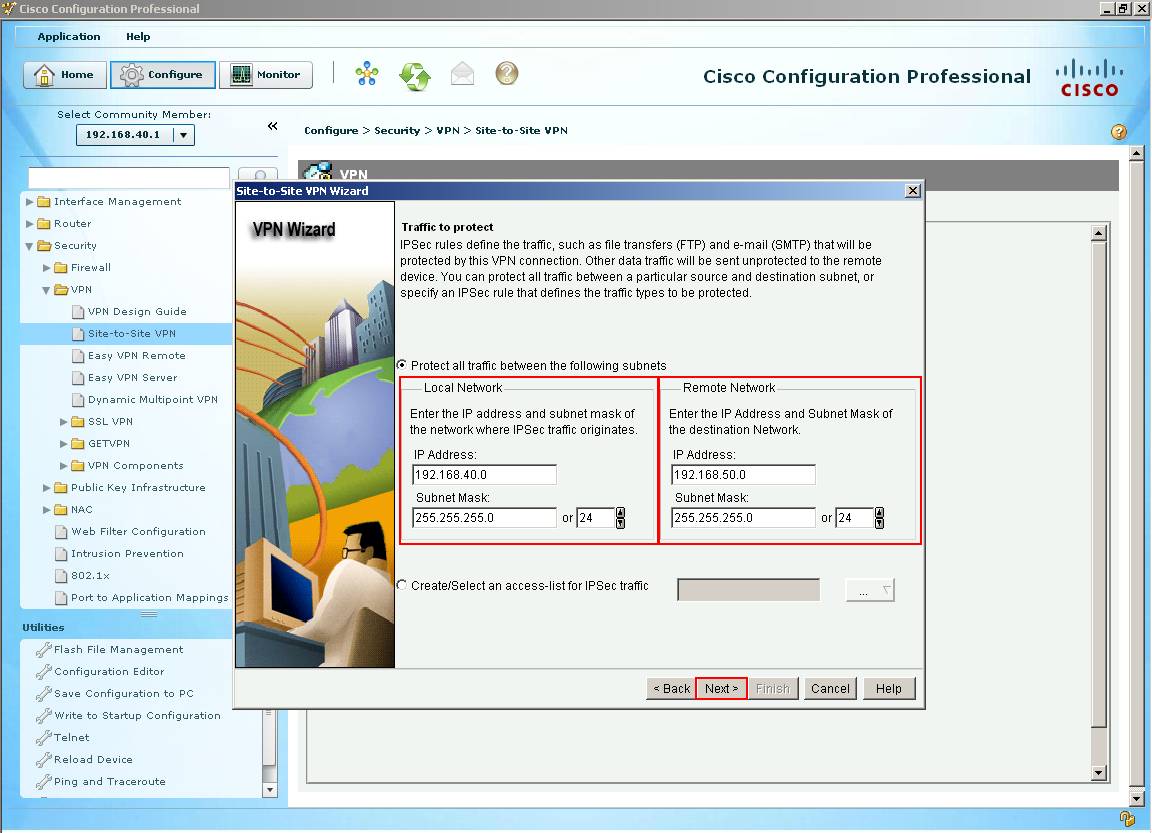 We have reached the summary screen which gives us an overview of what will about happen if we decide to deliver these commands by clicking Finish. Let's see what happens.
 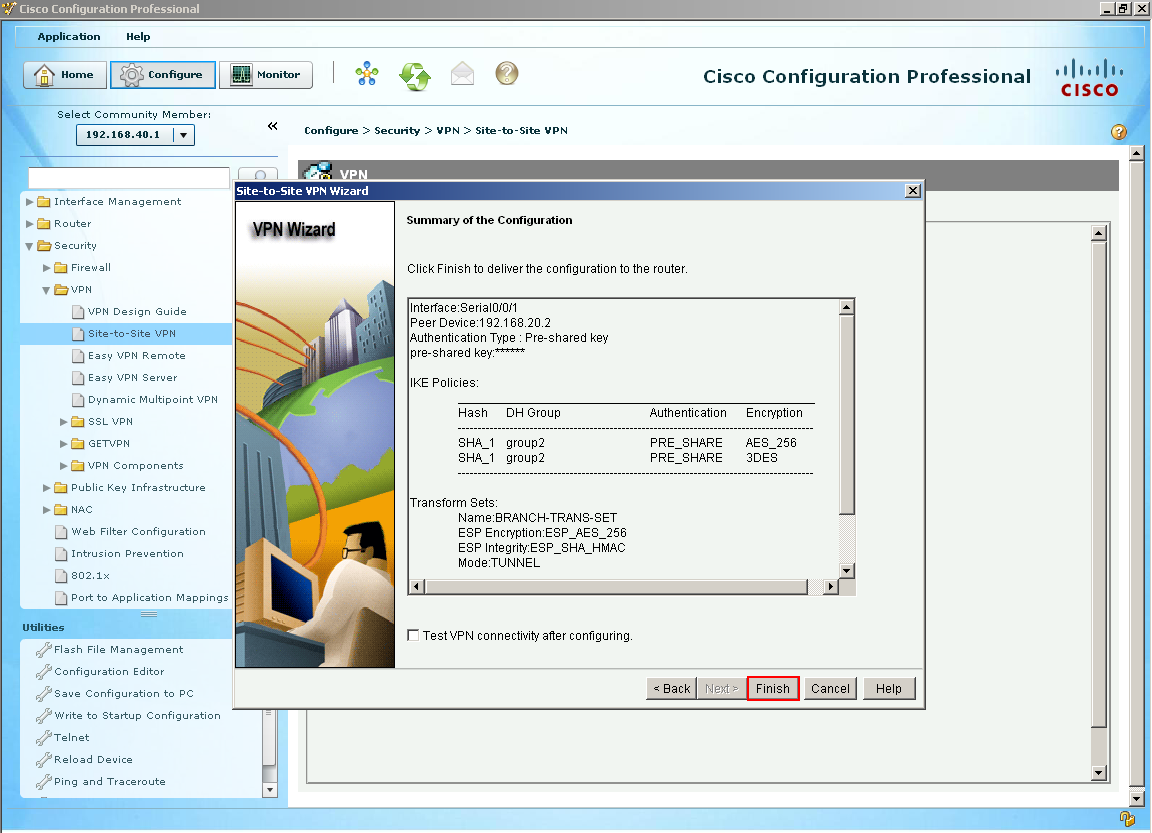 Since this is treated like an internet connection I have setup a NAT/PAT rule to translate address to my serial interface on Branch-1. Basically CCP detected this rule and wants to change it. So for this example I will let CCP go ahead and make the change by selecting Yes.
 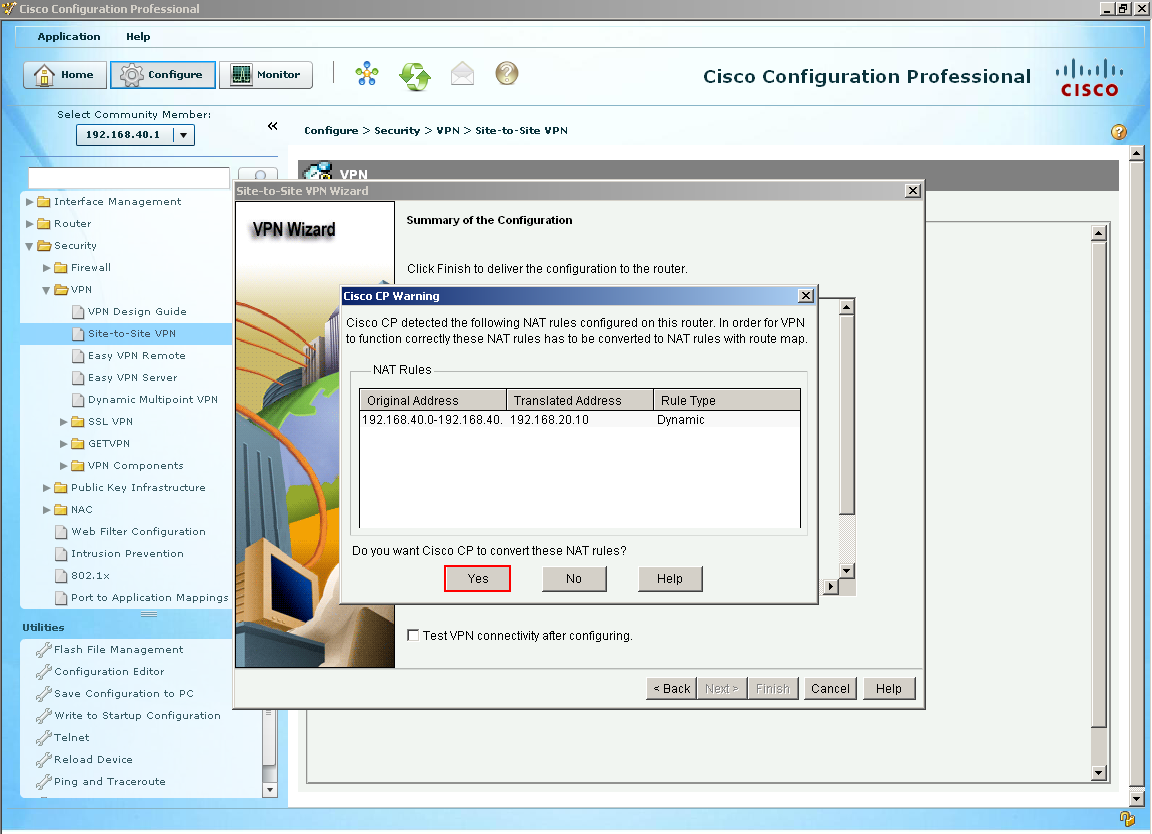 Here is a list commands CCP has generated to make my VPN tunnel a dream come true and is about deliver them. Let's deliver these commands!
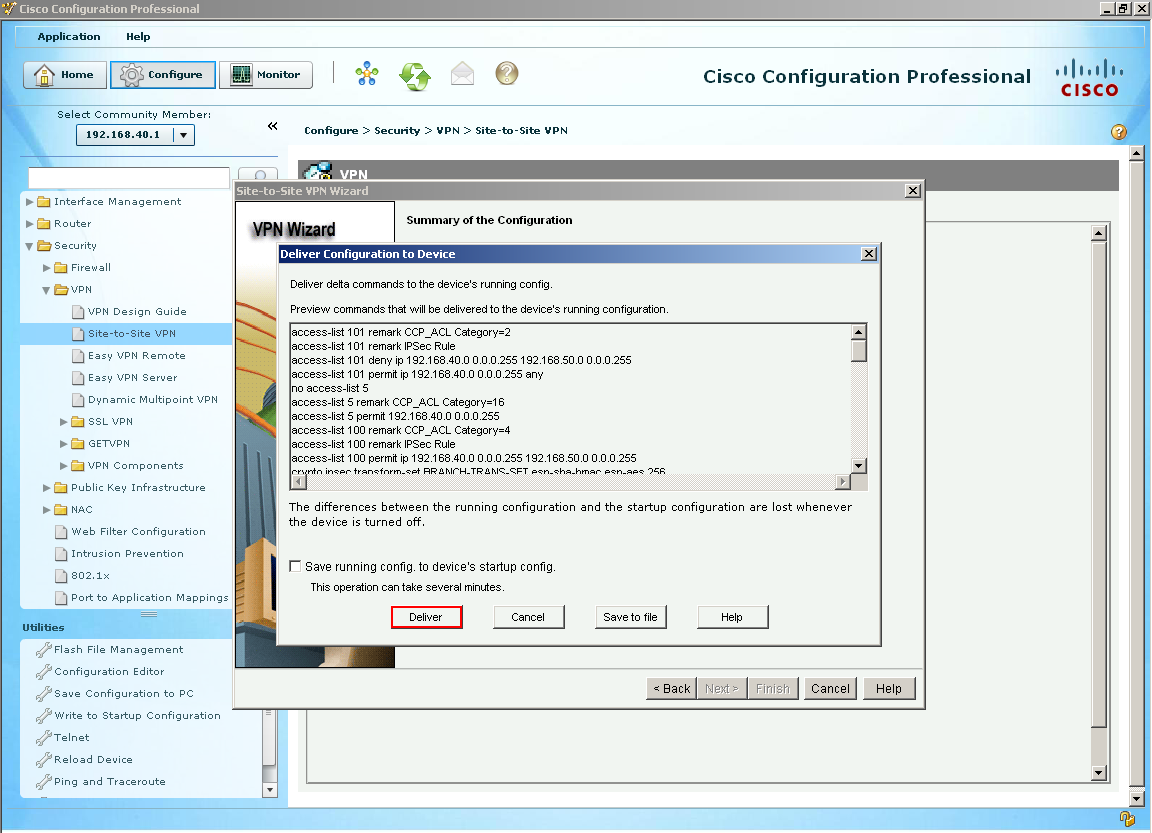
Unfortunately the tunnel is still down because we have to configure the other side which is Branch-2. We want to do the same thing we did on Branch-1 but change our peer to point to 192.168.20.10 (which is Branch-1's outside address) Add the same IKE Proposal and Transform-Set as did with Branch-1 onto Branch-2 and finally flip our traffic to protect. For the local network we put Branch-2's LAN and for the remote we put Branch-1's LAN. Once both sides are created they won't come up until that interesting traffic comes along either from Branch-1's LAN going to Branch-2's LAN or Branch-2's LAN going to Branch-1's LAN. So I have a PC on Branch-2 and to test this tunnel I am able to ping Branch-1's FastEthernet Interface (192.168.40.1) from 192.168.50.6 which is my PC. ``` C:\Documents and Settings\Administrator>ipconfig
Ethernet adapter Local Area Connection: Connection-specific DNS Suffix : BRANCH2.example.com IP Address : 192.168.50.6 Subnet Mask : 255.255.255.0 Default Gateway : 192.168.50.1
C:\Documents and Settings\Administrator>ping 192.168.40.1
Pinging 192.168.40.1 with 32 bytes of data: Reply from 192.168.40.1: bytes=32 time=7ms TTL=254 Reply from 192.168.40.1: bytes=32 time=9ms TTL=254 Reply from 192.168.40.1: bytes=32 time=5ms TTL=254 Reply from 192.168.40.1: bytes=32 time=5ms TTL=254
Ping statistics for 192.168.40.1: Packets: Sent = 4, Received = 4, Lost = 0 (0% loss), Approximate round trip times in milli-seconds: Minimum = 5ms, Maximum = 9ms, Average = 6ms ``` As we can see I am to ping this connection and that also confirms that the VPN tunnel is up! I hope this tutorial is helpful and below you will find the running-config of both Branch-1 and Branch-2 's configuration of making this VPN work.
Remember for a closed track you "technically" need another router in the middle of the branches but don't advertise the LANs. Go ahead and load it in Packet Tracer and or live equipment and give it shot you might have to reconfigure some settings deepening on your setup and Packet Tracer does not accept all of the commands. Good Luck and comment below if you have questions! I would be happy to answer them :)
Related articles
- Configuring AAA - Locally (ryansrealm.com/ciscoskills)
- Introduction into Cisco Configuration Professional (ryansrealm.com/ciscoskills)