Configure a Site-to-Site VPN via SDM
So for today's post let's learn how to configure a site-to-site VPN on a router using the Cisco SDM (Security Device Manger). The Cisco SDM is a Web-based device management tool a GUI for Cisco routers this can simplify router deployments and cut ownership costs. (See the post Configuring SDM) Let's start configuring a site-to-site VPN with SDM!
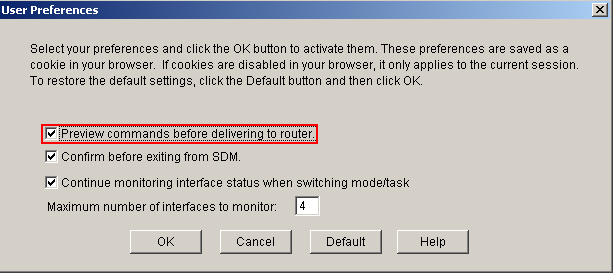
This tutorial is assuming that the configurations to set up Cisco SDM have already been completed. For this tutorial all we want to focus on is configuring the VPN. Since this using Cisco SDM the VPN wizard is pretty simple to understand. Before we get started however I like to have the Cisco SDM preview the commands before I deliver them to the router.
To do that at the top of the menu bar click Edit and select Preferences a new window will appear (Like below) and verify that the Preview commands before delivering to the router is checked.
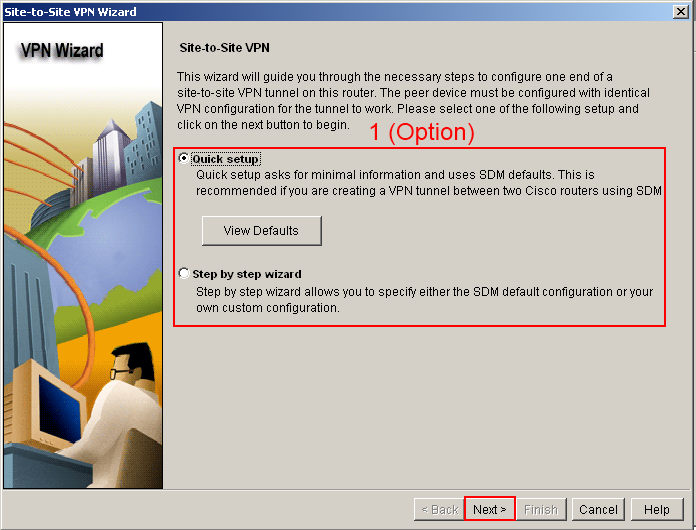
Once Cisco SDM is opened click on the configure button at the top of the SDM screen and select the VPN button on the left hand side under Tasks. Under the VPN folder select the Site-to-Site VPN. You now have two choices, for this tutorial we are using the first option. (Create a Site to Site VPN) Once you have selected your option select the Launch the selected task to begin the wizard.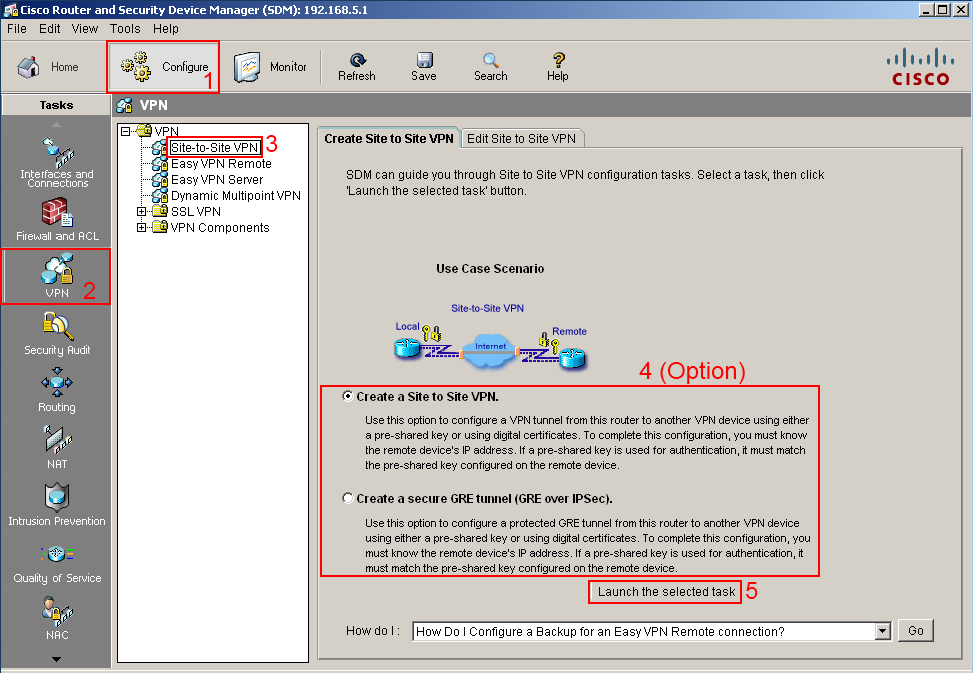 A new window will open (Site-to-Site VPN Wizard) this welcome page will introduce you the settings you can choose. The quick setup will ask for minimal information when configuring the router. You can also view defaults the quick setup will attempt to deliver to the router by selecting the View Defaults button. There is also a Step by step wizard which allows more flexible options. (For this tutorial we are choosing the Quick setup wizard) Click Next.
 The next part of the wizard will show (VPN Connection Information) this screen has the following configuration options, VPN connection (which interface will have the VPN option), the peer identity, the authentication types, and the traffic that needs to be encrypted.
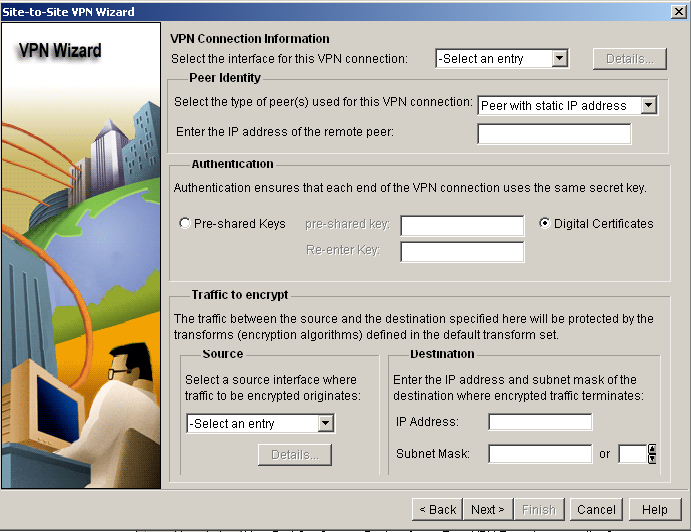 Focusing on the VPN connection information, which interface will have the VPN? For this tutorial we selected serial 0/0.
 If you selected the detail button, you can get additional information about the connection (interface) you selected.
In this tutorial we selected serial 0/0 and clicking on the details gives us more information about the connection.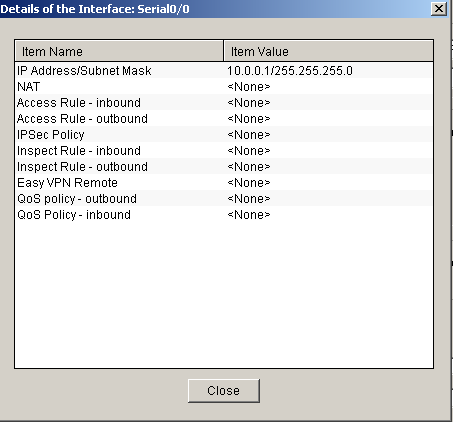 Let's now focus on the Peer Identify; if you selected from the drop-down box Peer with static address this address will be the other router IP address.
For this tutorial the IP address is 172.16.1.1.
Focusing on the Authentication, you can have two options when using the Quick Setup wizard, pre-shared keys or Digital Certificates. (For this tutorial we are using pre-shared keys) These keys must be the same on the other end of the VPN tunnel in order for the VPN to work.
 Towards the bottom of the screen we have one final configuration step, the traffic to encrypt.
The source traffic is the traffic that will be encrypted when it leaves the local interface, this traffic will only be encrypted when the traffic goes to the destination IP address. (For this tutorial the connection is Fast-Ethernet 0/0 and the traffic will be encrypted when the destination IP address is 192.168.3.1 with a 255.255.255.0 subnet mask.) Click Next.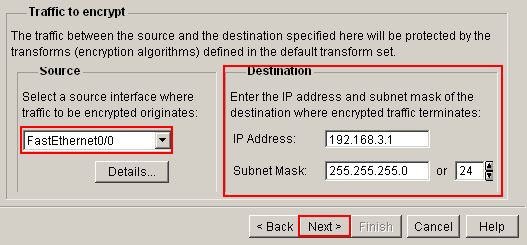
The next section is the summary screen for the Site-to-Site VPN configuration, here you can look over the summary to verify the configuration. Click Finish.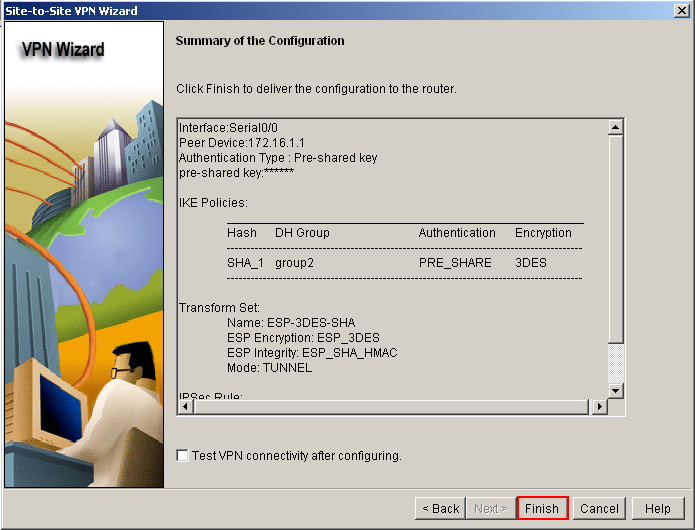 If you've selected the option to preview commands before delivering them to the router, a final window will appear. In this window you can see the real commands the SDM program will attempt to deliver. You have the option to save the running-configuration to the startup-configuration after the commands complete. You also have the option to save the configuration as a file and finally you can deliver them to the router.
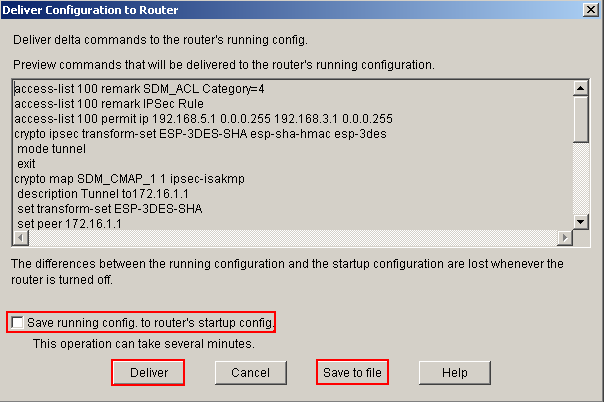
That's it! Believe it or not that's the SDM configuration for Site-to-Site VPN configuration you can get more information at Cisco's website about SDM and the configuration settings. Like always I hope this tutorial was informative and if you have a suggestion on the next topic that relates to ICND1 or ICND2 and even some CCNA Security comment below.
