Configuring RIPv2
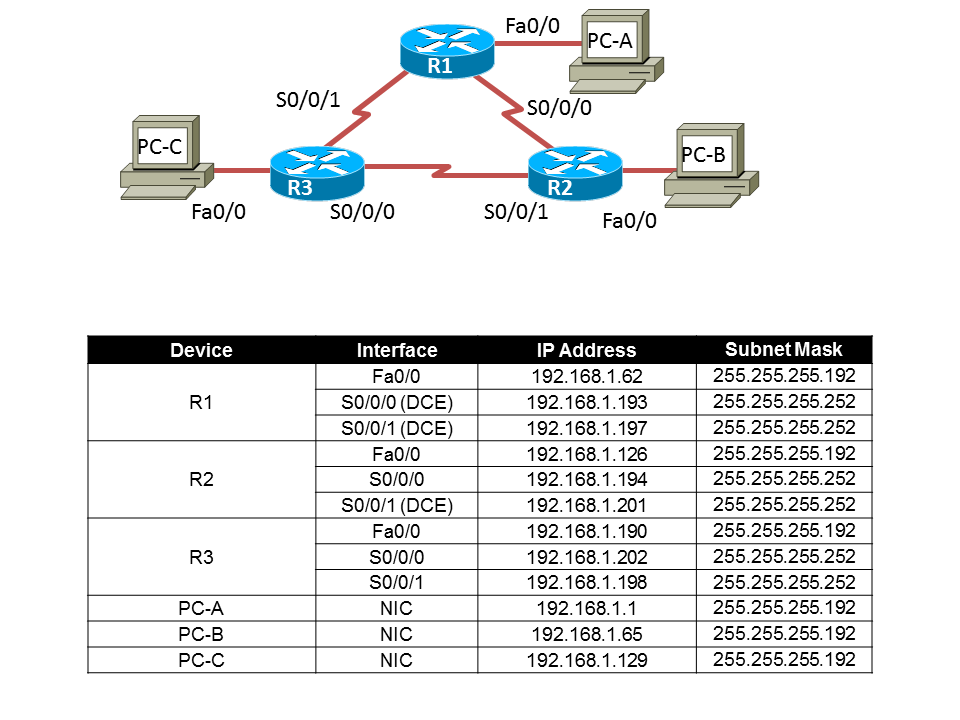
This guide will go over how to configure RIPv2 on Cisco routers. This guide follows a packet tracer activity that is posted at the end of this tutorial. RIPv2 configuration is pretty simple to understand with really only three required commands to use besides the network command which depends how many networks are connected to your router.
 So following the packet tracer that is used with this tutorial the first step is to configure the hostname on the routers. Enter into the router and type the command enable to move into privilege EXEC mode, then type configure terminal to move into global configuration mode and type hostname then the name of the router. (this example is for R1)
Router>enable
Router#configure terminal
Router(config)#hostname R1
R1's Interface Setup:
R1(config)#interface fa0/0
R1(config-if)#ip address 192.168.1.62 255.255.255.192
R1(config-if)#no shut
R1(config-if)#exit
R1(config)#interface s0/0/0
R1(config-if)#ip add 192.168.1.193 255.255.255.252
R1(config-if)#clock rate 64000
R1(config-if)#no shut
R1(config-if)#exit
R1(config)#interface s0/0/1
R1(config-if)#ip add 192.168.1.197 255.255.255.252
R1(config-if)#clock rate 64000
R1(config-if)#no shut
R2(config)#interface fa0/0
R2(config-if)#ip add 192.168.1.126 255.255.255.192
R2(config-if)#no shut
R2(config-if)#exit
R2(config)#interface s0/0/0
R2(config-if)#ip add 192.168.1.194 255.255.255.252
R2(config-if)#no shut
R2(config-if)#exit
R2(config)#interface s0/0/1
R2(config-if)#ip add 192.168.1.201 255.255.255.252
R2(config-if)#clock rate 64000
R2(config-if)#no shut
R3(config)#interface fa0/0
R3(config-if)#ip add 192.168.1.190 255.255.255.192
R3(config-if)#no shut
R3(config-if)#exit
R3(config)#interface s0/0/0
R3(config-if)#ip add 192.168.1.202 255.255.255.252
R3(config-if)#no shut
R3(config-if)#exit
R3(config)#interface s0/0/1
R3(config-if)#ip add 192.168.1.198 255.255.255.252
R3(config-if)#no shut
R1(config)#router rip
R1(config-router)#version 2
R1(config-router)#network 192.168.1.0