Configuring PAT
This tutorial will help you configure PAT (Port Address Translation), or sometimes called NAT (Network Address Translation) with overload on a Cisco router. PAT uses multiple private IP addresses and translates them into a single or very few public IP addresses. This is possible because the private IP addresses are mapped to the port number of the PC. Let's get started!!!

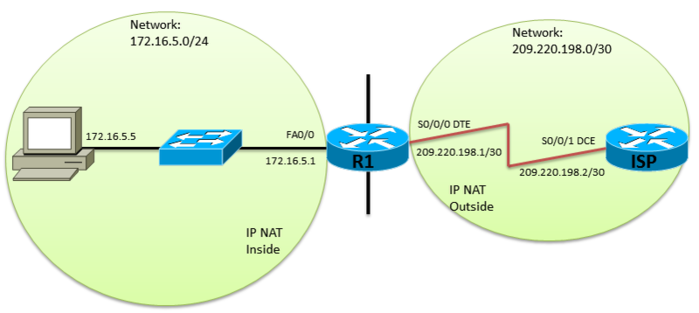
With the above shown topology we see that we are using two routers called ISP and R1 we also have one switch (default configuration) and a PC connected to R1's Fa0/0 interface. Both routers need to be setup with basic router configuration and IP address added to the interfaces of ISP and R1 along with the PC to be configured with the supplied IP address. Also a default-gateway on the PC and clock rate on ISP's serial interface before we can get stated. (This tutorial is assuming you can already do that) ;) Now that the basic setups have been configured we need an IP route on R1 to ISP. We want to define that any IP address not in R1's routing table needs to be sent to the ISP. To do that move to global configuration mode and type the command ip route and the IP address of ISP's serial interface:
R1(config)#ip route 0.0.0.0 0.0.0.0 209.220.198.2
R1(config)#ip route 0.0.0.0 0.0.0.0 s0/0/0
R1(config)#access-list 5 permit 172.16.5.0 0.0.0.255
R1(config)#ip nat inside source list 5 interface serial s0/0/0 overload
R1(config)#interface fa0/0
R1(config-if)#ip nat inside
R1(config)#interface s0/0/0
R1(config-if)#ip nat outside