Trunk Ports
A trunk port is a type of switch port that carries traffic for multiple VLANs (Virtual Local Area Networks) rather than just one. It allows different VLANs to communicate across network switches while maintaining their separation.
Features of a Trunk Port:
Carries multiple VLANs, unlike an access port which is assigned to a single VLAN a trunk port can transport traffic from multiple VLANs on the same interface.
Encapsulation methods, uses protocols like: * IEEE 802.1Q - Industry standard. * ISL (Inter-Switch Link) - Cisco proprietary, and obsolete by the mid-2000s.
Switch-to-switch communication, typically used to connect switches, routers, or other network devices that need to handle multiple VLANs.
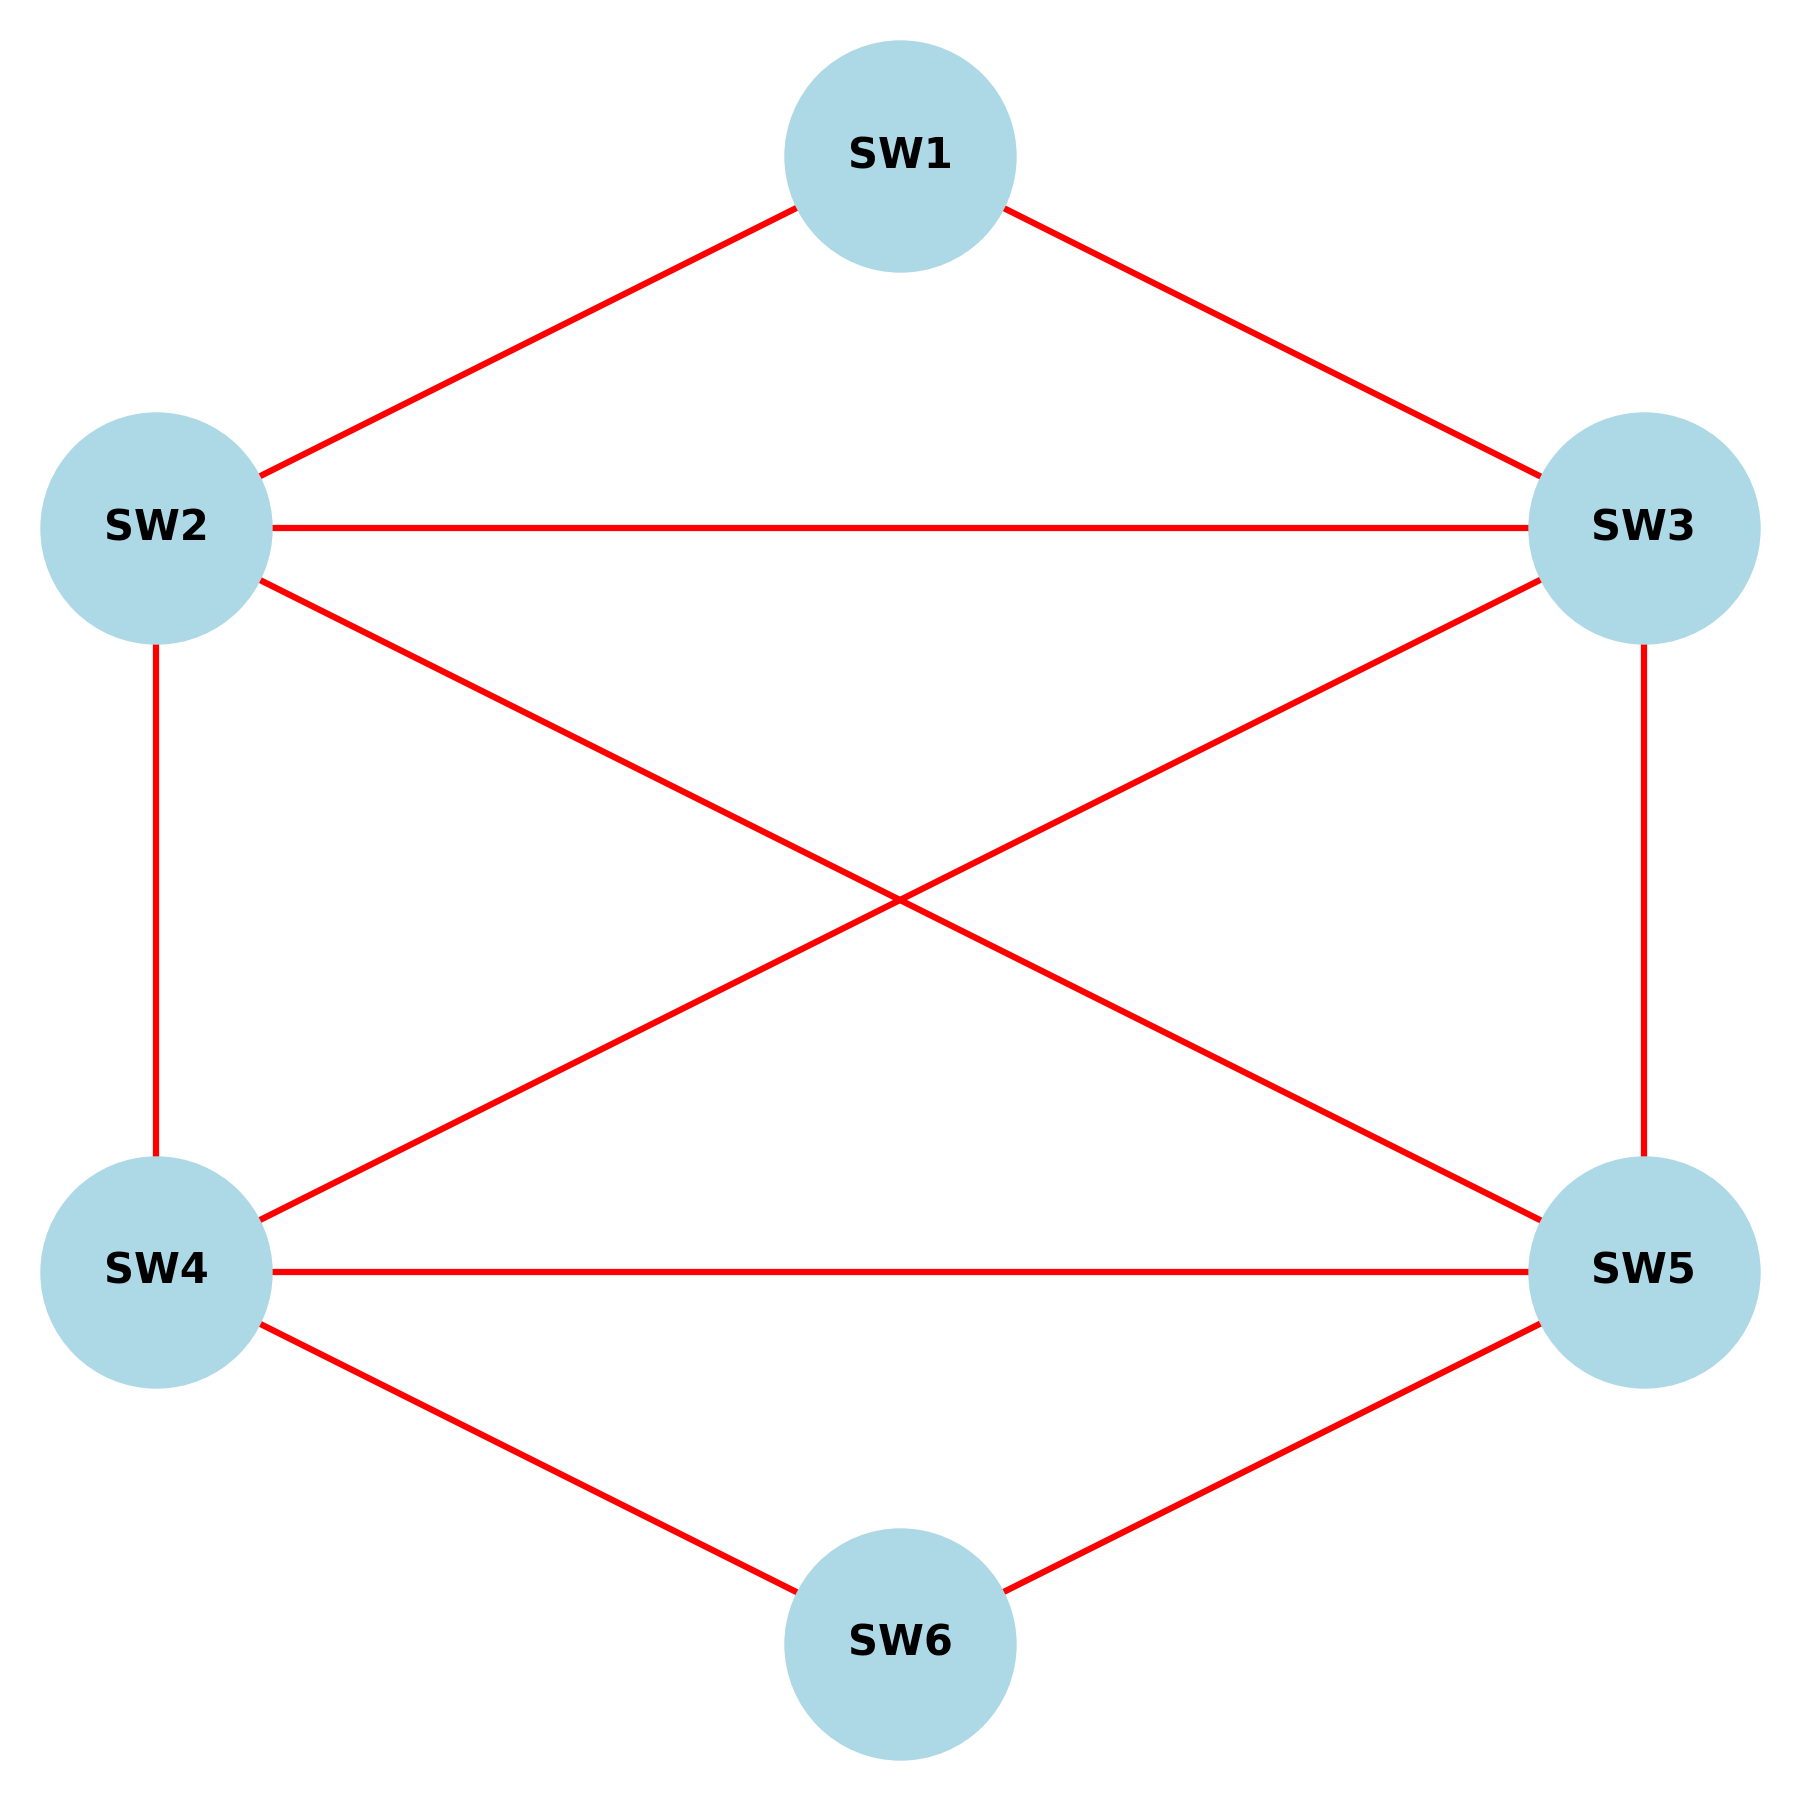
For example, if you have VLANs 10, 20, and 30 on different switches, a trunk port ensures that traffic from all three VLANs can travel between them while keeping the VLANs logically separate. In the picture below SW0 would have trunk ports between SW1-SW3.

Lab:
Requirements & Topology:
Cisco Modeling Labs 2.8+ (paid version)
Lab Download (Github): Trunked_VLANs.yaml
In this Lab:
We have six IOSvL2 switches, although not depicted in the topology these switches have two links connected to each other. This lab is going to focus on configuring trunk links and VLANs. For example controlling which VLANs are allowed on particular trunk link. We will also look at dynamic trunks and basic VTP operation.
Note
This lab has been bootstrapped via CML with default passwords and host names are already configured.
Task 1:
- Shutdown all ports on all six switches and configure the VTP domain to be: ryansrealm.com We also need to change the VTP mode to server for all switches.
Answer
Switches 1 and 6 are using the following interfaces:
show ip interface brief
Interface              IP-Address      OK? Method Status                Protocol
GigabitEthernet0/0     unassigned      YES unset  up                    up
GigabitEthernet0/1     unassigned      YES unset  up                    up
GigabitEthernet0/2     unassigned      YES unset  up                    up
GigabitEthernet0/3     unassigned      YES unset  up                    up
Loopback0              unassigned      YES unset  administratively down down
config t
interface range gigabitEthernet 0/0-3
shutdown
exit
exit
show ip interface brief
Interface              IP-Address      OK? Method Status                Protocol
GigabitEthernet0/0     unassigned      YES unset  up                    up
GigabitEthernet0/1     unassigned      YES unset  up                    up
GigabitEthernet0/2     unassigned      YES unset  up                    up
GigabitEthernet0/3     unassigned      YES unset  up                    up
GigabitEthernet1/0     unassigned      YES unset  up                    up
GigabitEthernet1/1     unassigned      YES unset  up                    up
GigabitEthernet1/2     unassigned      YES unset  up                    up
GigabitEthernet1/3     unassigned      YES unset  up                    up
Loopback0              unassigned      YES unset  administratively down down
config t
interface range gigabitEthernet 0/0-3 , gigabitEthernet 1/0-3
shutdown
exit
exit
vtp domain ryansrealm.com will change the VTP domain. To change the VTP mode to from transparent to server running this command on all sessions/switches vtp mode sever.
Task 2:
Configure an 802.1Q (dot1q) trunk link between SW3 and SW5: - SW3 G1/1 and SW5 G0/3 should be a trunk link unconditionally. Bring the interfaces up. - SW3 G1/0 should be a trunk link but actively negotiate a trunk link on its port. SW5 G0/2 should be only configured to negotiate a trunk once it receives negotiation packets from a neighboring port and actively try to convert links into trunk ports.
Answer
On SW3 and SW5 we want to trunk unconditionally, on both interfaces (SW3 G1/1 and SW5 G0/3) running this command while in configuration mode will setup a trunk link. The keyword I used unconditionally for me that also meant to bring up a trunk with out any negotiations going on. It's going to be trunk link.
When you put a switchport into trunking mode, by default it will still negotiate trunking with DTP frames, (Dynamic Trunking Protocol). Depending how you read this task I would also put in switchport nonegotiate on both SW3 G1/1 and SW5 G0/3 interfaces.
Switch(config-if)switchport trunk encapsulation dot1q
Switch(config-if)switchport mode trunk
Switch(config-if)switchport nonegotiate
Switch(config-if)no shut
sw3(config-if)#switchport trunk encapsulation dot1q
sw3(config-if)#switchport mode trunk
sw3(config-if)#no shutdown
Negotiation of Trunking output:
sw3#show interfaces switchport | begin 1/0
Name: Gi1/0
Switchport: Enabled
Administrative Mode: trunk
Operational Mode: trunk
Administrative Trunking Encapsulation: dot1q
Operational Trunking Encapsulation: dot1q
Negotiation of Trunking: On
Access Mode VLAN: 1 (default)
Trunking Native Mode VLAN: 1 (default)
Administrative Native VLAN tagging: enabled
Voice VLAN: none
-- Omitted --
sw5(config-if)#switchport mode dynamic desirable
sw5(config-if)#no shutdown
show interfaces trunk
On SW5:
sw5#show interfaces trunk

Port        Mode             Encapsulation  Status        Native vlan
Gi0/2       desirable        n-802.1q       trunking      1
Gi0/3       on               802.1q         trunking      1
We can see that Gi0/3 the mode is ONand Gi0/2 is set for desirable as well as n-802.1q meaning its been negotiated.
Note
This command does not tell if DTP frames are being sent or not. You would have to check the show interfaces switchport command to verify that and look at to see if Negotiation of Trunking is ON
Task 3:
- Between SW4 (G0/2, G0/3) and SW5 (G0/0, G0/1) interfaces bring up a trunk link with SW5 being passive on negotiation of the trunk. While SW4 to auto trunk and actively negotiate but use the standard dot1q encapsulation, and bring up the interfaces.
Answer
For SW4 we can do a range command and type in the following to auto trunk and actively negotiate trunking but also use the dot1q as the encapsulation method.
sw4(config)#interface range gigabitEthernet 0/2-3
sw4(config-if-range)#switchport trunk encapsulation dot1q
sw4(config-if-range)#switchport mode dynamic desirable
sw4(config-if-range)#no shutdown
sw5(config)#interface range gigabitEthernet 0/0-1
sw5(config-if-range)#switchport mode dynamic auto
sw5(config-if-range)#no shutdown
Task 5:
- Between SW4 (G0/0, G0/1) and SW2 (G1/1, G1/0) configure the SW2 interfaces to be trunk links with the dot1q standard. While SW4 to auto trunk and passively negotiate.
Answer
On SW2 we can just run the following commands using the comma interface range command:
sw2(config)#interface range gigabitEthernet 1/1 , gigabitEthernet 1/0
sw2(config-if-range)#switchport trunk encapsulation dot1q
sw2(config-if-range)#switchport mode trunk
sw2(config-if-range)#no shutdown
switchport mode dynamic auto command.
sw4(config-if-range)#interface range gigabitEthernet 0/0-1
sw4(config-if-range)#switchport mode dynamic auto
We can verify that we are trunking using the show interfaces trunk command.
Output of SW4:
sw4#show interfaces trunk

Port        Mode             Encapsulation  Status        Native vlan
Gi0/0       auto             n-802.1q       trunking      1
Gi0/1       auto             n-802.1q       trunking      1
Gi0/2       desirable        802.1q         trunking      1
Gi0/3       desirable        802.1q         trunking      1
Output of SW2:
sw2#show interfaces trunk

Port        Mode             Encapsulation  Status        Native vlan
Gi1/0       on               802.1q         trunking      1
Gi1/1       on               802.1q         trunking      1
Task 6:
Configure the following VLANs, 3–10, 100, 150, 200, 450, 230, 359, 353, 240, 250, and 340 on SW2 only. Ensure they are propagated to the following switches. - SW3 - SW4 - SW5
Answer
On SW2 we can create VLANs and they will be propagated automatically because we have switches in the same VTP domain but they will only be propagated with an active trunk link. So for like SW1 and SW6 they won't have those VLANs because there is no active trunk link.
Running the following command to create VLANs on SW2 will also create VLANs on SW3, SW4, and SW5
sw2(config)#vlan 3-10,100,150,200,450,230,359,353,240,250,340
Task 7:
Add VLANs to the following interfaces:
| Switch | Interface | VLAN |
|---|---|---|
| SW3 | G1/1 | 5-10 |
| SW5 | G0/3 | 5-10 |
| SW3 | G1/0 | 100, 150, 450 |
| SW5 | G0/2 | 100, 150, 450 |
| SW2 | G1/1 | All but 340 |
| SW4 | G0/1 | All but 340 |
| SW4 | G0/0 | 8-10, 250, 340 |
| SW2 | G1/0 | 8-10, 250, 340 |
Answer
Going over this table we can see that the following commands of switchport trunk allowed vlan and switchport trunk allowed vlan except will be used. A couple of things to remember the ADD command will add the to the VLAN current list while the REMOVE will remove VLANs from the current list. By default if you just add switchport mode trunk that will trunk all VLANs by default.
You can verify what VLANs are running on a trunk by running the show interfaces trunk command. In the output belwo this is from SW3
sw3#show interfaces trunk

Port        Mode             Encapsulation  Status        Native vlan
Gi1/0       on               802.1q         trunking      1
Gi1/1       on               802.1q         trunking      1

Port        Vlans allowed on trunk
Gi1/0       1-4094
Gi1/1       5-10
Summary:
So we went over what trunk links are and how they can segment networks virtually while being on the same physical network. We added trunks to interfaces in this lab while talking about DTP and how it is on by default. In addition to looking at switchport mode dynamic and the different type of "Auto truk modes" As well as working with VTP in a very simple way, of how it can propagated VLANs to other switches instead of manually adding VLANs.
Really for the CCIE you should know how VLANs work, how to add them to trunks, as well as remove them and how to verify what VLAN is on a trunk link.
Tip
Although not every device is explicably called out in this lab the idea of this is for you to lean and explore on your own. You have a staring point so feel free to play with trunk links. Although it may seem very basic its a building block to other technologies and is fundamental.